FEA assisted measurement of Young's modulus and Poisson's constant in stout horn blanks.
David Wuchinich
Modal Mechanics
Yonkers, NY
Copyright David Wuchinich 2002
Abstract
Measurement of the first flexural and the first torsional free-free resonant frequencies are employed to adjust assumed values for Young's modulus and Poisson's constant in finite element models until frequency equivalence is established. The method yields, with simple production laboratory test equipment, measurement accuracies of one percent, thereby providing information necessary for precision computational assisted horn design.
Introduction
Accurate design of extensional resonators whose lateral dimensions are comparable to their length, such as the horns used in plastic welding equipment, requires precise knowledge of both Young’s modulus and Poisson’s constant if substantial correction to their dimensions necessary to produce the desired resonant frequency is to be avoided. Even for same alloy and specification, Young’s modulus may vary as much as ten percent from the nominal value given by the manufacturer, a variation that introduces a 5 percent variation in the horn frequency. Most ultrasonic systems are intolerant of frequency deviations of more than 2 percent, a situation that often requires deliberate alteration of horn to achieve compliance.
The variation of Poisson’s
constant within the same material type and specification is less known, but the
constant, a measure of expected lateral motion in horns, plays an increasingly
important role in determining frequency as the horns become stout. The effect of coupled strains is always to
lower the design frequency. Again, to
avoid post horn fabrication trimming, precise knowledge of this constant is
necessary.
Typically, Young’s modulus and
Poisson’s constant are measured in static strength testing fixtures where both
the extension and lateral dilation are measured for known applied extensional
strain. This technique, while accurate,
requires large and expensive hydraulic test stands and the preparation of
specimens for which horn blanks having diameters comparable to their lengths
are not be suitable candidates.
Finite element analysis (FEA)
permits, given accurate material information, make-to-print horns that actually
work as intended without post fabrication tuning. It also offers a way to permit test frequency measurements on the
horn blank itself, along with the blank dimensions and density, to be used to
determine both the modulus and Poisson’s constant.
Theory
Assuming a blank of uniform cross
section and square faces, measurement may be made of both the first free-free
flexural and torsional vibration frequencies, Ff and Ft
respectively. Both frequencies depend
upon the square root of Young’s modulus, but the torsional frequency also
depends directly upon Poisson’s constant, as the torsional sound velocity is
proportional to the square root of the modulus of rigidity, G, also known as
the shear modulus and defined as:
![]()
![]() (1)
(1)
where E is
Young’s modulus and m denotes
Poisson’s constant. Ff, in
the first approximation, depends only upon E.
To determine both constants, an
FEA model is generated from the blank’s dimensions and the modal frequencies
extracted from analysis using manufacturer’s data for the constants. The model is constructed of meshes or
regions whose further reduction in size does not change the computed
frequencies within the precision needed.
The value of E is then corrected to produce in a second analysis
(1st iteration) a value of Ff equal to that measured.
Attention is then directed to the
computed value of Ft. Using
the expression given by Eq. 1 and noting that the torsional sound velocity
varies as the square root of the quantity, correction is made to m to
produce in a third analysis (2nd iteration) a computed value of Ft
equal to that measured.
Returning the value of Ff
produced by the 2nd iteration analysis, E is again corrected
to produce in a fourth analysis (3rd iteration) equivalence between
computation of Ff in computation and measurement.
The process continues focusing
next upon Ft if necessary until sufficient precision is obtained in
the result. Because Ff is
far less sensitive than Ft to changes in m, the
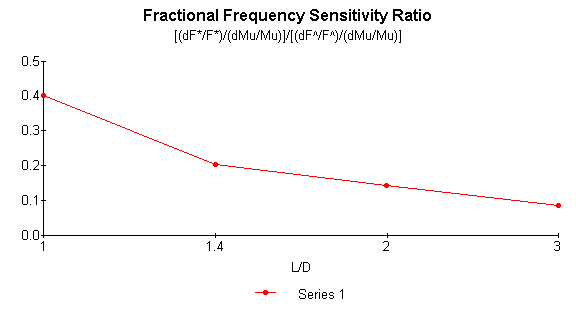
computation will converge. Figure 1
illustrates the computed relative frequency sensitivity of the extensional and
torsional resonant frequencies to a fractional variation in Poisson’s constant
and to the ratio of the length (L) to diameter (D) of a horn blank. Figure 2 is a schematic representation of
the iterative process.

Figure 1
– Computed Flexural/Torsional frequency sensitivity to Poisson's Constant in a
round stout horn blank
E1 m1 E2 Ffo,
Fto ® Ff1=
Ffm, Ft1 ® Ff2,
Ft2=Ftm ® Ff3=Ffm,
Ft3 --®-- Ffn=Ffm, Ftn=Ftm 1 2 3 n Ffm, Ftm denote measured
flexural and torsional frequencies
Figure 2 – Iterative computational procedure for determining Young’s modulus and Poisson’s constant.
In Figure 1 F* and F^
are the first free-free flexural and torsional frequencies
respectively. Mu denotes Poisson’s
constant. It is seen that, even when
the length of blank equals its diameter, the flexural frequency is less than
half as sensitive to changes in m than is the torsional frequency.
In place of Ff the
extensional resonant frequency can also be used, but as, will be subsequently
discussed, the flexural frequency can be obtained with simple test equipment
and remains well defined at values of L/D near unity.
Method
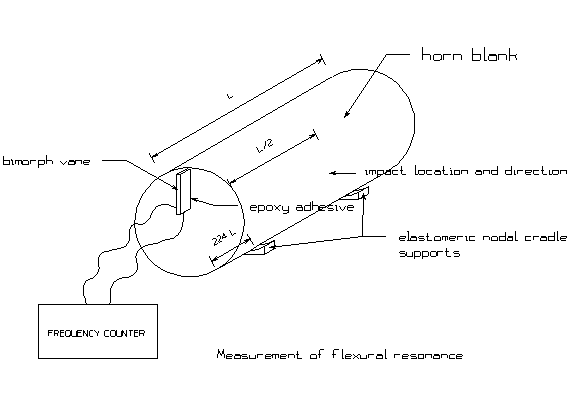
The apparatus used to measure the
flexural resonance is sketched in Figure 3.

Figure 3 -
Measurement of Ff
The blank is supported by soft
elastomeric supports at the location of the two nodes of the first free-free
flexural mode, and the blank is struck with a ball peen hammer as shown at its
center. The flexural mode is easily
excited in this manner. A bimorph vane[1]
is cemented, using fast setting cyanoacrylate or epoxy adhesive, along a radius
of one face with wire connections to its electrodes attached to a frequency
meter. The vane is positioned relative
to the impact such that the resulting motion of the face is in a direction to
flex the vane. To ascertain that the
frequency obtained is indeed the flexural vibration, a preliminary calculation
can be done to determine the approximate expected value[2]. Even for blanks intended for subsequent life
as 20 kHz horns whose diameter or largest lateral dimension equals the length,
the first flexural frequency is usually audible.
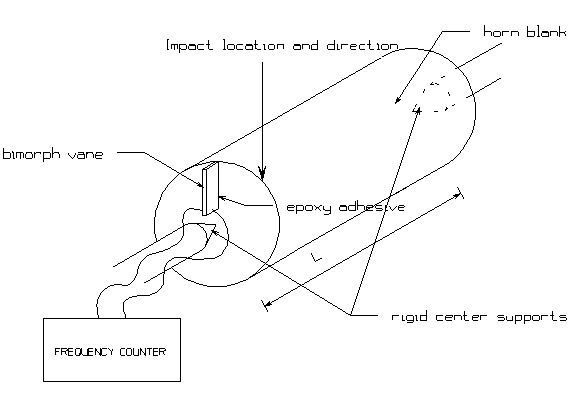
Using the
same blank and bimorph attachment, the measurement of the first free-free
torsional mode is made as shown in Figure 4.

Figure 4 -
Measurement of Ft
The centers of the free faces are
pinned, for example in lathe head and tail stock centers, to both support the
blank and also suppress the excitation of extension and flexural modes. Again, the approximate expected torsional
frequency can be computed from the blank’s dimensions, given assumed values of
the modulus and Poisson’s constant[3]. The blank is struck at one end
asymmetrically to excite torsion. As
the modulus of rigidity is usually significantly smaller than Young’s modulus,
the torsional frequency is also audible for blanks cut for use in 20 kHz
extensional resonators.
In making both measurements, but
particularly when measuring Ft, oscilloscope monitoring of the
bimorph signal was found helpful initially in identifying excitation of the
desired mode, a condition apparent in the progressive decay of the vibration
over an interval of several seconds during which time the frequency indication
remained the same.
Results and Discussion
Two 6Al-4V titanium horn blanks
were evaluated in this study. Their
dimensions, frequencies and computed values of frequencies, E and m are shown
in Table 1. Three iterations were
required to bring the computed frequencies, Ffc and Ftc,
within 0.2 percent of those measured.
Subsequent use of these blanks in horn designs produced operating
frequencies within one percent of the calculation.
|
Blank |
Diameter mm |
Length mm |
Ftm Hz |
Ftc Hz |
Ffm Hz |
Ffc Hz |
E
GPa |
m |
|
1 |
63.6 |
134.4 |
11679 |
11679 |
11144 |
11127 |
114 |
0.288 |
|
2 |
82.5 |
141.2 |
11088 |
11064 |
11720 |
11716 |
112 |
0.288 |
Table 1
FEA assisted computation of material constants.